Tag Archives: ATmega328 microcontroller

Recreating the UK Color Clock with Arduino

The Color Clock website endeared the online community just a short time ago, and with this inspiration in mind, a Maker by the name of Sound Guy decided to develop his own. With some leftover project parts in hand, Sound Guy constructed his own version that included some extra bells and whistles.

FIBMI6CI0C8XQQD.MEDIUM

The Color Clock idea revolves around a computer converting the time into a hex value. Then, this data is used to provide a background color that corresponds with that exact moment in time. As the time changes, so does the background and mood of your clock.

Sound Guy had an extra Arduino Uno R3 (ATmega328) and Adafruit 1.8” Color TFT Shield he was looking to repurpose. He went on to solder the Arduino Uno and the TFT Shield together and then looked to attach a Real Time Clock (RTC) module. “To attach the RTC module I happened to have some jumper cables with Dupont connectors, female on one end and male on the other. These are great for connecting to peripherals or breadboards,” Sound Guy writes.

Once completed, he moved onto the coding process. While many of the sketches came directly from the TFT and RTC module, Sound Guy included his own coding and has shared it within his Instructables post.

To make his project stand out from the rest, Sound Guy even incorporated a joystick that allows him to navigate a simple menu. The menu can provide controls for color and screen brightness.

For a full tutorial on how to create your own Color Clock, feel free to explore Sound Guy’s awesome Instructable’s guide here.

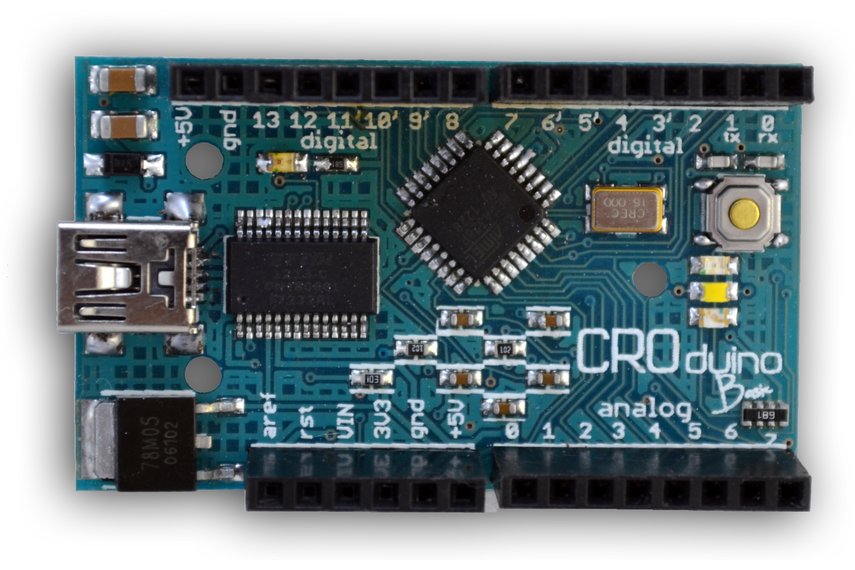
Croduino Basic sells for $21 on Tindie


The open source Croduino Basic – currently selling for $21 on Tindie – is built around Atmel’s wildly popular ATmega328 microcontroller (MCU).

Aside from Atmel’s MCU, the board targets both Makers and developers with a wide range of features, including:

  • 

14 digital I/O (6PWM outputs)
  • 
8 analog inputs
  • 
FTDI RS232 as USB converter
  • 
Built-in 5V voltage regulator
  • USB mini-B cable

It should be noted that Croduino measures just 5cm x 3cm, making it easy for DIY tinkerers to integrate into various projects.

Interested in learning more? You can check out the project’s official Tindie page here, courtesy of the e-radionica.com crew.

In addition, you can view the project source code here, documentation here and BoM here.

ATmega328 external serial monitoring – sans PC


Serial monitors are typically used to help Makers and engineers more easily debug their projects.

However, as HackADay’s Will Sweatman notes, traditional serial monitors require a PC or laptop loaded with a terminal program.

“Most of the time this is not an issue, because the PC is used to compile the code and program the project at hand,” Sweatman explained.

“But what if you’re in the field, with a mission of fixing a headless system and in need a serial monitor? Why lug around your PC when you can make your own external serial monitor?”

And that is precisely why ARPix designed a barebones, albeit fully functional serial monitor around Atmel’s versatile ATmega328 microcontroller (MCU) and a 102 x 64 LCD display.

Although the minimalistic platform lacks a keyboard port like some other external monitors, tact switches facilitate access to the user interface (UI) for start and stop commands. As expected, the tact switches can also be used to set the baud rate.

Interested in learning more? You can check out the project’s official Instructables page here, which offers the relevant sketches and parts list.

Printoo brings everyday objects to life


Printoo is a printed electronics prototyping platform designed to help bring everyday objects to life.

The versatile platform – created by Ynvisible – can be easily embedded in various materials, including paper.

“In a world where computers have become an integral part of our live, Printoo aims to give people the ability to embed everyday object and devices with computational power,” a Ynvisible rep explained on the product’s official site.

“It enables new ways to link the physical and the digital worlds. [Plus], the platform is fully compatible and programmable with the Arduino IDE.”

The core Printoo module is powered by Atmel’s ATmega328 microcontroller (MCU). Additional hardware modules include a display driver, battery connector, batteries (soft and ultra-thin), battery holder, sensor module, solar cell connector, conductive ink adapter, DC motor drivers, electrochromic display, organic photodetector slider, polymer solar cell and LED strip.

The Ynvisible crew has also created a number of Printoo-powered demos such as a Bluetooth fan, 3D printed watercraft, solar powered 3D printed hovercraft, “girlfriend communicator,” electronic voter and the Printoo Man.

Printoo is expected to go live later this month on a crowdfunding website. Interested in learning more? You can check out the product’s official page here.

Building a Mini 7-Segment Clock (V2)


Kevin Rye recently re-designed his already impressive Mini 7-Segment Clock using an SMD version (instead of 28-pin DIP) of the ATmega328 microcontroller (MCU) and a custom PCB.

“I moved the switches a little off-center to the right and shuffled everything else around in order to fit the SMD ATmega,” Rye explained in a recent blog post.

“I rotated the ATmega 45 degrees. I think chips look cooler when they’re rotated, but in all seriousness, it is easier to run a trace from one side of the board to the far side of the chip when it’s rotated.”

Rye also moved most of the (PCB) text from the front to the back. However, with the exception of the ICP and FTDI headers, the board layout remained the same.

 After receiving his new PCBs, Rye decided to kick off a limited test of his new design.

“I didn’t want to put the whole thing together and find out that it didn’t work, [so] I decided to only solder in the ATmega, the 16MHz crystal, and the supporting caps and resistors – just enough so I could test loading the bootloader onto the ATmega and upload a sketch,” said Rye.

“I configured my Arduino Uno (ATmega328) as an ISP and attached the Mini Clock’s 6-pin ICP header to the Arduino via a ribbon cable and some jumpers. I then jumped into the Arduino IDE and burned the bootloader for an Uno.”

After successfully running the bootloader, Rye connected the FTDI adapter and uploaded the blink sketch, jamming an LED into the PCB and watching the LED blink. Last, but certainly not least, Rye validated the ICP and FTDI functions and soldered in the rest of the components.

Interested in learning more about version two of Kevin’s Mini 7-Segment Clock? You can check out his detailed project blog post here and download the source files here.